Your kitchen sink faucet spray hose is not working properly and you want to replace it but don’t know where to start. Don’t worry, you are in the right place. With a damaged or faulty spray head, you can’t complete washing and cleaning tasks.
If you are thinking of calling a plumber to replace the sprayer hose of the kitchen sink faucet, just read this guide once. It is an easy DIY process and can be completed without taking the help of anyone.

On Sale
Moen Sleek Kitchen Faucet With Power Clean Spray (Best Rated)
Spot Resist Stainless finish, exclusive Power Boost technology, Equipped with the Reflex system, secure docking of the spray head
Check also – Best Kitchen Sink For Outdoor Use
Prepare The Sink
Before replacing the kitchen sink faucet spray hose, it’s important to prepare the sink area for a smooth and hassle-free replacement process.
Start preparation by turning off the water supply to the kitchen sink faucet. Turn the shut-off valves beneath the sink in the clockwise direction to reduce the leak or mess.
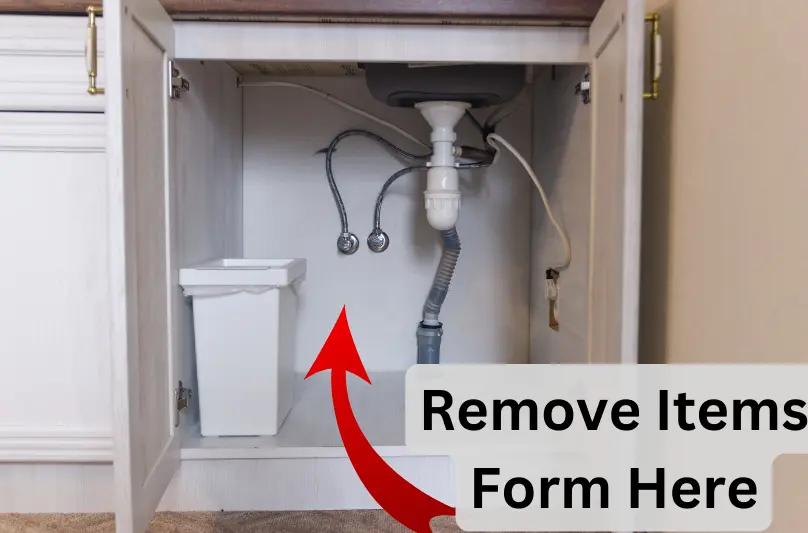
Remove everything above and under the sink. Make the space completely empty so you can get enough space to work there. Remove any dishes, utensils, or cleaning supplies around the sink to create a clear workspace.
Under the sink, you might have stored items. Remove them so you have enough room to maneuver under the sink.
What Tools You Need To Replace Spray Hose on Sink Faucet?
This process can be done within a few minutes if you have the right tools set. Here is the tools list that you need to complete to replace the kitchen faucet spray head.
- Adjustable wrench
- Screwdriver
- Pliers
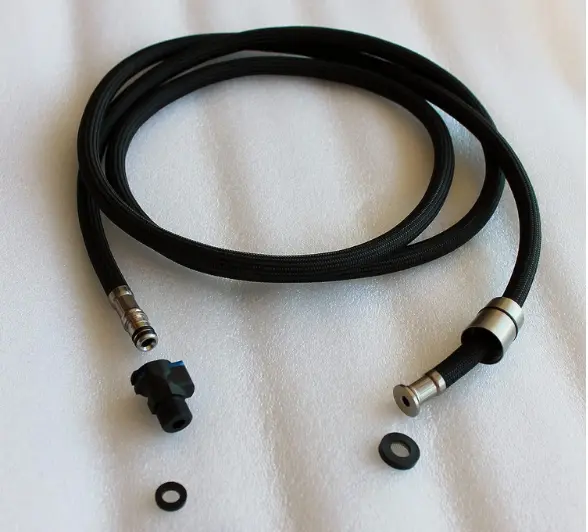
- New kitchen sink sprayer
- Plumer’s Putty
How To Replace Sprayer Hose on Kitchen Sink Faucet?
The kitchen sink sprayer hose is the main part of kitchen sink faucet. If you are among those few unlucky people who want to replace the spray hose of the kitchen sink faucet, these steps are for you.
Remove The Old Sprayer Hose
Removing the old kitchen sink sprayer hose is the first step in this process. The connections of the old spray hose will be found under the sink. You have already cleaned under the sink area, but there might not be enough light to see connections. So, use a flashlight to see clearly.
Locate The Spray Hose Connection
There might be threaded connections or quick-fitting connections of the spray hose. The connection types will depend on the faucet brand. To disconnect these connections, follow the below methods.
- If you have threaded connections, use an adjustable wrench to loosen the nut securing the hose to the faucet.
- If you have quick-fitting connections, depress any locking tabs or buttons and gently pull the hose away from the fitting.
Removing Any Clips or Brackets Holding the Hose in Place
After disconnecting the connections of the kitchen sink sprayer, you can remove it. But in some cases, there might be clips or brackets to keep it securely under the sink.
Look for any clips or brackets securing the hose to the cabinet walls or other fixtures. To remove these clips or brackets, you will need a screwdriver or a plier to loosen them. After removing the clips and brackets, you can gently pull the hose away from its secured position.
Even after turning off the water supply, there might still be some residual water in the old hose. So, it would be better to keep a bucket under the hose to catch any remaining excess water. Now, the first part of replacing the spray hose of a kitchen sink faucet is completed.
Install The Spray Hose
Here is the second part of replacing a kitchen faucet spray hose. Here you will find how can you install a new kitchen faucet sprayer hose and connect it to the faucet and water supply connection.
Attach The New Hose To The Faucet
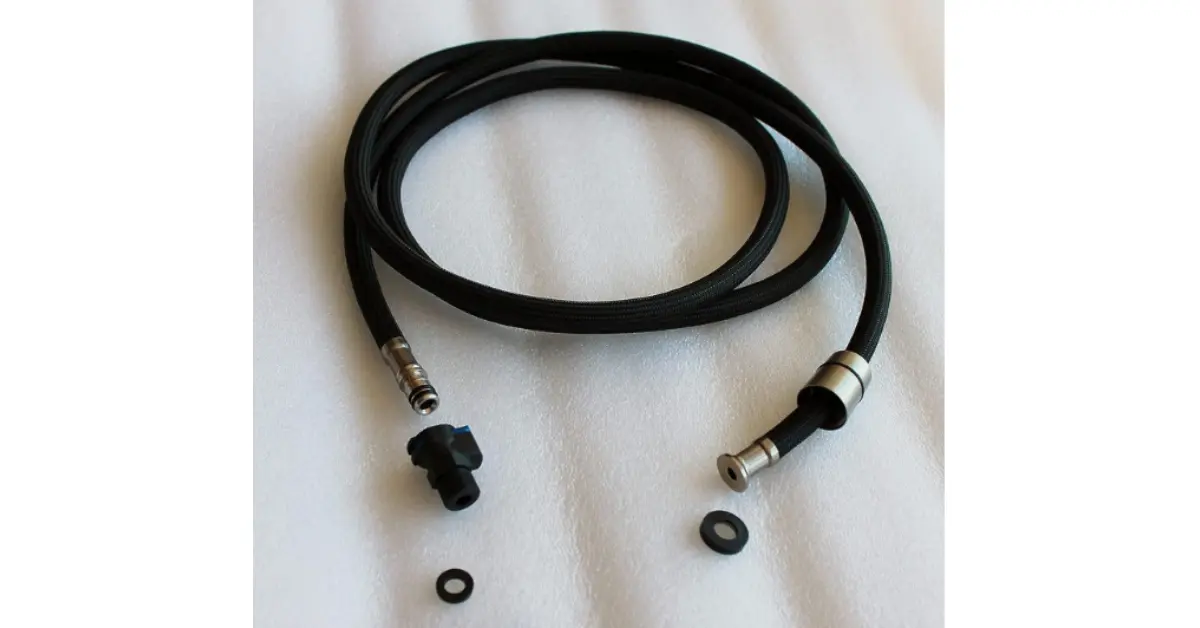
There are 2 ends for the spray hose. You need to identify which end will be connected to the spray head of the faucet and which one will be connected to the water supply connections. Usually, the end with a female or nut-shaped fitting goes to the faucet.
On the kitchen sprayer threads wrap some plumber’s tape. It is essential to create a watertight seal and prevent leaks.
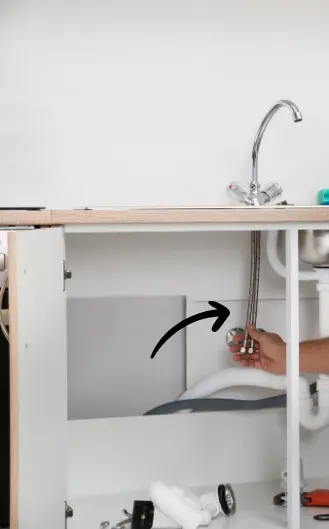
Carefully screw the female end of the new hose onto the male connection of the faucet. To fit it properly, use a wrench.
Just like when attaching the hose to supply lines, make sure you’re connecting the right end to the sprayer head. The sprayer end will typically have a fitting that matches the sprayer head’s connection.
Screw the hose onto the sprayer head’s connection. Again, use a wrench to tighten it securely without overdoing it.
Now that both ends of the new sprayer hose are attached, double-check all your connections.
Securing the Hose with Clips or Brackets
This step is optional. If your old sprayer hose was secured with clips or brackets, you can use those clips and brackets to secure the new one. If you do this, you make sure that the hose won’t hang loose or get tangled under the sink.
If the old clips or brackets are in good condition, use them. Otherwise, you can buy new.
Place the clips or brackets at appropriate intervals along the hose length. Make sure these are giving proper support to the hose.
To secure the clips in their place, you can use screws or adhesive. Make sure they are firmly in place and won’t move when the hose is pulled.
Reattaching the Weight or Counterweight to the Hose
Many sprayer hoses have a weight or counterweight designed to help the sprayer retract back into its original position after use. If your old hose had one, be sure to reattach it to the new sprayer nozzle in the same position. This makes sure that your sprayer functions correctly.
Check Leaks
Before you move on, it’s essential to conduct a leak test to ensure everything is properly sealed.
Turn on the water supply to the faucet assembly. Start with a slow flow to detect any potential leaks before the water pressure increases. Check every connection for leaks. Look for any drips or moisture around the threaded areas.
If you see any leaks, turn off the water supply immediately and retighten the connections as needed.
Common Signs You Need To Replace The Sprayer Hose
First, the clear sign is if there are any leaks around the sprayer hose or the spray head.
A spray hose has different spray patterns, but with time, its spray patterns won’t remain as new and you see an inconsistent spray pattern. It may happen due to a worn-out sprayer nozzle or a damaged hose.
In most cases, water pressure in the sprayer hose on the kitchen sink becomes slow. The reason for this is clogged holes due to hard water. There might be other reasons for this, such as a diverter valve or a kinked hose under the sink.
If you notice any corrosion or cracks on the sprayer hose, it may be a sign that it needs to be replaced.
Check Also – How To Get Rid of Bad Smell Under Sink
How To Clean Sprayer Hose on Kitchen Sink?
In some cases, if you clean the sink sprayer hose, you can reuse it without replacing it. By cleaning the spray hose, you can unclog its clogged parts and improve water pressure.
- Before starting the cleaning of the sprayer hose, turn off the main water supply to prevent any water damage.
- Unscrew the sprayer head from the hose by twisting it counterclockwise. By removing the sprayer head, you can access the inside of the hose for cleaning.
- Fill a bowl with warm water and a mild dish soap solution. You may use vinegar instead of dish soap.
- Submerge the sprayer head in the soapy water and let it soak for about 15-20 minutes. This will help loosen any dirt, debris, or mineral deposits.
- After soaking, use a soft brush or toothbrush to gently scrub the sprayer head. It will remove any remaining residue and then rinse the spray head.
- While the sprayer head is detached, it is a good idea to turn on the water supply for a few seconds to flush out any debris or buildup from the hose. This will help provide a clean and clear flow of water.
On Sale
Moen Sleek Kitchen Faucet With Power Clean Spray (Best Rated)
Spot Resist Stainless finish, exclusive Power Boost technology, Equipped with the Reflex system, secure docking of the spray head
Check also –
- How To Remove Chemical Stains From Stainless Sink
- Best Kitchen Sink For Butcher Block Counter
- DIY Process To Remove Rust From Sink
Final Thoughts
Replacing a sink faucet sprayer hose can be accomplished by homeowners without calling a plumbing fixtures expert. Follow the steps outlined in this guide to complete replacement with ease. While attaching the new sprayer hose, make sure you properly tighten all connections. By doing so, you can enjoy a properly functioning sprayer hose and avoid any potential leaks or issues in your kitchen sink faucet.
FAQs
Are All Sprayer Hoses Universal?
All sprayer hoses are not universal. They come in different sizes and types. So, when you find a new sprayer hose for your kitchen faucet, you should check its compatibility with the faucet.
Can I Replace Just The Sprayer Head Instead of The Entire Hose?
Yes, you can replace the sprayer head without replacing the entire hose. It depends on which part of the faucet is faulty and needs replacement.
How Do I Determine The Correct Length For The Replacement Sprayer Hose?
To get the correct length idea, you should check the length of the old sprayer hose. Also, you can measure the length from the connection point under the sink to the sprayer head.
Recommended By BeautifulKitchenguide's Team
Little Lunches - Personalized Meal Planning - 7 Day Free Trial
Amazon Must Have Kitchen Gadgets To Save Time Check List
Best Kitchen Faucets of 2025: Sleek, Durable & Worth Every PennyCheck Our Review
The Ultimate Guide to the Best Coffee Makers for Every Budget Check Our Review